JUnit을 시작해보자 ^_^
* 개발환경: OS X Yosemite / Android Studio 1.3.2
1. 프로젝트 생성
기본 옵션으로 Blank Activity 프로젝트를 생성한다.
2. Unit Test 폴더 구조 생성
Junit 테스트의 경우, src/test/java를 기본 테스트 폴더로 인식한다. 그렇기 때문에 폴더명을 수정해준다~! 마우스 우클릭 > Refactor > Rename > "androidTest"를 "test"로 수정
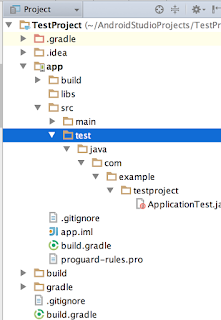
* 테스트 폴더가 안보인다면 좌측 상단을 Project로 선택해주면 된다
3. 빌드 스크립트 수정
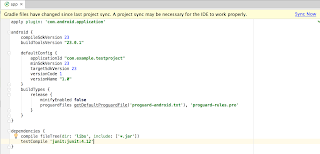
app의 build.gradle 파일을 열어서 dependency에 testCompile 구문을 추가해준다. 그 다음, Sync now 클릭!
4. Test Artifact 설정
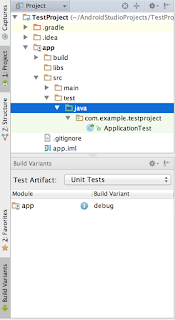
좌측 하단 Build Variant 탭을 클릭한 후 Test Artifact를 Unit Tests로 설정해 준다. 그러면 아래와 같이 폴더 아이콘이 초록색으로 변경된다~!

여기까지 성공했다면, 환경설정 끝!
5. Unit Test 코드 작성
정상적으로 작동하는지 알아보기 위해 간단히 Calculator 클래스를 만들어서 두 정수를 더하는 메소드를 테스트 해보자 ^_^! 아래와 같이 Calculator랑 CalculatorTest 클래스를 생성하고 코드를 써준다~~
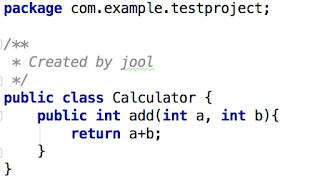
클래스 생성해주고
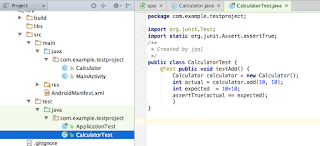
테스트 코드를 작성해준다! ^_^!
6. 테스트 하기~~
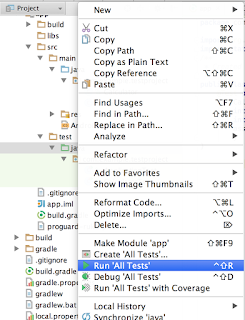
테스트 java 폴더에서 우클릭하여 Run 'All Tests' 클릭하여 테스트 해준당!
끄읏~~~~~
덧.
내 환경에서는 위와 같이 했을 때 다음과 같이 fail이 2개가 생겼다 ㅜ_ㅜ

로그 내용
java.lang.RuntimeException: Method setUp in android.test.ApplicationTestCase not mocked. See http://g.co/androidstudio/not-mocked for details.
at android.test.ApplicationTestCase.setUp(ApplicationTestCase.java)
at org.junit.internal.runners.JUnit38ClassRunner.run(JUnit38ClassRunner.java:86)
at org.junit.runners.Suite.runChild(Suite.java:128)
at org.junit.runners.Suite.runChild(Suite.java:27)
at org.junit.runners.ParentRunner$3.run(ParentRunner.java:290)
at org.junit.runners.ParentRunner$1.schedule(ParentRunner.java:71)
at org.junit.runners.ParentRunner.runChildren(ParentRunner.java:288)
at org.junit.runners.ParentRunner.access$000(ParentRunner.java:58)
at org.junit.runners.ParentRunner$2.evaluate(ParentRunner.java:268)
at org.junit.runners.ParentRunner.run(ParentRunner.java:363)
at org.junit.runner.JUnitCore.run(JUnitCore.java:137)
at com.intellij.junit4.JUnit4IdeaTestRunner.startRunnerWithArgs(JUnit4IdeaTestRunner.java:78)
at com.intellij.rt.execution.junit.JUnitStarter.prepareStreamsAndStart(JUnitStarter.java:212)
at com.intellij.rt.execution.junit.JUnitStarter.main(JUnitStarter.java:68)
at sun.reflect.NativeMethodAccessorImpl.invoke0(Native Method)
at sun.reflect.NativeMethodAccessorImpl.invoke(NativeMethodAccessorImpl.java:62)
at com.intellij.rt.execution.application.AppMain.main(AppMain.java:140)
이럴 경우 app의 build.gradle 스크립트에 다음과 같이 testOption을 추가해주면 된다.
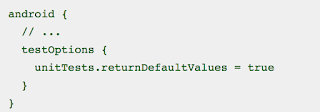
Sync now를 해주고 다시 Run'All Test'를 하면!

All Tests Passed! 진짜 끝~~~~~~^_^
다음 글에서는 robolectric에 대해 알아보자!
참고 논문 및 사이트
1. TDD/JUnit 조금 더 알기 http://www.slideshare.net/WonchangSong1/abouttddj-unit
2. Android Studio에서 Junit 기반 단위 테스트(Unit Test) 환경 구축하기 http://xinics.tistory.com/101#recentTrackback
3. Android Developer https://developer.android.com/training/testing/unit-testing/local-unit-tests.html
4. Android Tools Project Site http://tools.android.com/tech-docs/unit-testing-support
No comments:
Post a Comment